Just leave a comment with a link to your blog and I will follow you!

Wednesday, February 29, 2012

Blog Candy Contest Entry

400 Follow Giveaway!  I hope that I can have a giveaway soon.  I am thinking maybe something small for 25 followers... let me think about it!  But while I think about it hop on over to

For this amazing blog candy


Decoupaged Boxes

Over Christmas I made a few boxes for family for Christmas.  They loved them!  I mad most of them out unfinished wood boxes I found at Michael's.  I wanted to experiment with other materials too, so I tried paper mache boxes as well.  I actually originally found a bunch of recipe boxes made this way on Etsy.com.  I couldn't find one that I really liked at a gift for my Sister in Law so I made one.  I have not figured out the ink distressing so that it looks like all of their yet so I used paint.  I still think that the boxes are gorgeous!  I use acrylic paint, scrapbooking paper, and Mod Podge (in the glossy formula).  I think that I would like to try the matte finish next to see how that looks!  I have a few holidays coming up in which some boxed gifts might be in store.    

Here are my latest creations. 

Leopard print and burlap pattern scrapbook paper on a wooden box. 


This box is paper mache.


This box is paper mache


Tuesday, February 28, 2012

Boutique Style Cards

My younger sister is turning 24 in a week so I needed to make a Birthday card.  I got carried away and made 3!  They turned out so beautifully!


I made the bow with ribbon and a brad that I had in my embellishment drawer, the Embossing was done with my Sizzix Dots folder, and the border was cut from Stretch Your Imagination Cricut cartridge.
This is the card I ended up sending to my sister.
Entered into PTT Challenge Anything Goes


The embossing is (on card) Cuttlebug Spots & Dots and (the band) Sizzix dots folder, the flower is from Stretch Your Imagination Cricut cartridge and the "happy birthday" is from Sweet Treats Cricut Cartridge.  the "stitching" was done by me by hand.
 

The card was the negative of the first card I made, I felt bad throwing all of that away so I glued it to the card and let it dry before peeling it off my Cricut Cutting Mat.  The Center is household aluminum foil embossed with my Sizzix flower mini folder that came with the Sizzix Texture Boutique.


Monday, February 27, 2012

Saturday Morning Puffs


These were absolutely heavenly!  They just melted in our mouths!  I make pancakes or waffles every weekend for breakfast, I wanted to change up the routine.  I scoured through the 20 + books and magazines for something quick and easy and delish!  I found the recipe for French Breakfast Puffs in my big Betty Crocker book.  I had everything on hand and it took 30 minutes.  Here is the recipe that I followed.


French Breakfast Puffs
Pin It

 Ingredients:
1/3 cup shortening
1/2 cup sugar
1 egg
1 1/2 cups all-purpose flour
1 1/2 teaspoons baking powder
1/2 teaspoon salt
1/4 teaspoon ground nutmeg
1/2 cup milk

1/2 cup sugar
1 teaspoon ground cinnamon
1/2 cup butter or margarine, melted

Heat oven to 350ºF. Grease 15 medium muffin cups, 2 1/2x1 1/4 inches.
Mix shortening, 1/2 cup sugar and the egg thoroughly in large bowl. Stir in flour, baking powder, salt and nutmeg alternately with milk. Divide batter evenly among muffin cups.
Bake 20 to 25 minutes or until golden brown and a toothpick inserted in center of puff comes out clean
Mix 1/2 cup sugar and the cinnamon. Roll hot muffins immediately in melted butter, then in sugar-cinnamon mixture. Serve hot.

Friday, February 24, 2012

Monsters are in the Mail!

Oh my goodness gracious!!  What a week I have had!! I finished working on Lil Mr's birthday party invitations on Monday and they FINALLY made it to the mail box today!! 

Monday night Lil Mr. started running a fever!  I figured he had whatever everyone else had.  He started to get congested and would not eat or drink.  No biggie for one day.  Wednesday morning rolled around (2:30 AM) and Lil Mr. had a 104.7 fever!!! We took him in the doc as soon as we could.  He has a double ear infection.  Poor bubba.  Well we get him on the antibiotics and the diarrhea and the vomiting started Wednesday night.  So until about 2:00 AM Thursday we were at the children's hospital emergency room so he could get some hydration.  He slept all day Thursday and all night last night.  He feels so much better.

I finally got pictures of my Lil Monster's monster invitations.  All done with my Cricut Mini Monsters Cartridge and my Sizzix embosser.  So cute!  Here they are:


I entered these in a Shape card Challenge over at Double Click - AKA Abusybee


And here is how they open up:


Excuse the sloppy "Paint" censoring!


I think they turned out super cute.  However they are pretty big and awkward, so they didn't fit in any of my envelopes I had on hand.  I bought Wausau Stardust envelopes.  I want to say A9 size.  And used this video to make them fit each monster!  Wonderful video!


So now my monsters are in the mail!  I am going to try my hand at a monster cake for Lil Mr's birthday.  I am also going to try some party favors with my Mini Monsters! 

Happy Friday!

Friday, February 17, 2012

Glass etching in your Kitchen

So I decided to finally take my try at glass etching.  The results could have been better, but for my first project it turned out great!  I found the idea on Pinterest and followed it to this blog http://www.makeit-loveit.com/2010/06/glass-etching.html where I got the the step by step.  Then it hit me... I could do this with my Cricut!

This is everything that I used for this project
My Cricut
Contact Paper
Glass Etching Cream
Brush

I cut out these flowers using my Cricut from the Walk in my Garden cartridge


Our last name was done with the George and Basic Shapes cartridge


Then slather on the etching cream
The directions on the packaging said wait 60 seconds and the blog said 10 minutes
I am an over achiever so I went with the 10 minutes


Turned out really great


I did a little flower on the bottom too
Walk in my Garden cartridge


So pretty
My favorite part

Pin It

I found the glass etching cream at Michael's.  I took a little bit of calling around.  I called Lowe's and they hung up on me, I think they thought I said ITCHING cream!! I have since decided to look online for it and found it way cheaper EVERYWHERE else.

I think next time I am going to put more cream on and let it sit a little longer.  My next etching project is going to be a couple of cheap wine glasses I have sitting around and a few glass jars I have that I want to turn into mini vases!

**Remember, this is permanent!  The cream is an acid and actually corrodes the surface of the glass to give it that frosty look**

Thursday, February 16, 2012

Birthday Blog Hop

Carrie over at A Busy Bee is turning another year older and to celebrate she and her friends are having a Blog Hop.  Go check out the cool prizes and GORGEOUS projects!


Be Punny

I was inspired by a challenge on one of my favorite blogs.  The challenge is Fun with Puns on Fantabulous Cricut.  I made a few cute cards to add to my stash.
I bought a Sizzix Texture Boutique machine for embossing recently.  It is super cute, and way easy to use.  However I am disappointed in my purchase and kicking myself for not getting the Cuttlebug that I really wanted.  The Boutique is great for small projects like the ones above, but it is smaller that industry standards.  You can't use the texture plates in the Boutique!  A little bird told me that Big B has picked up on my (SUPER OBVIOUS) hints and is planning on getting me a Xyron Creatopia for my birthday!!  YAY!  So that should ease my embossing woes! 

Here are my super simple super cute cards: 
   
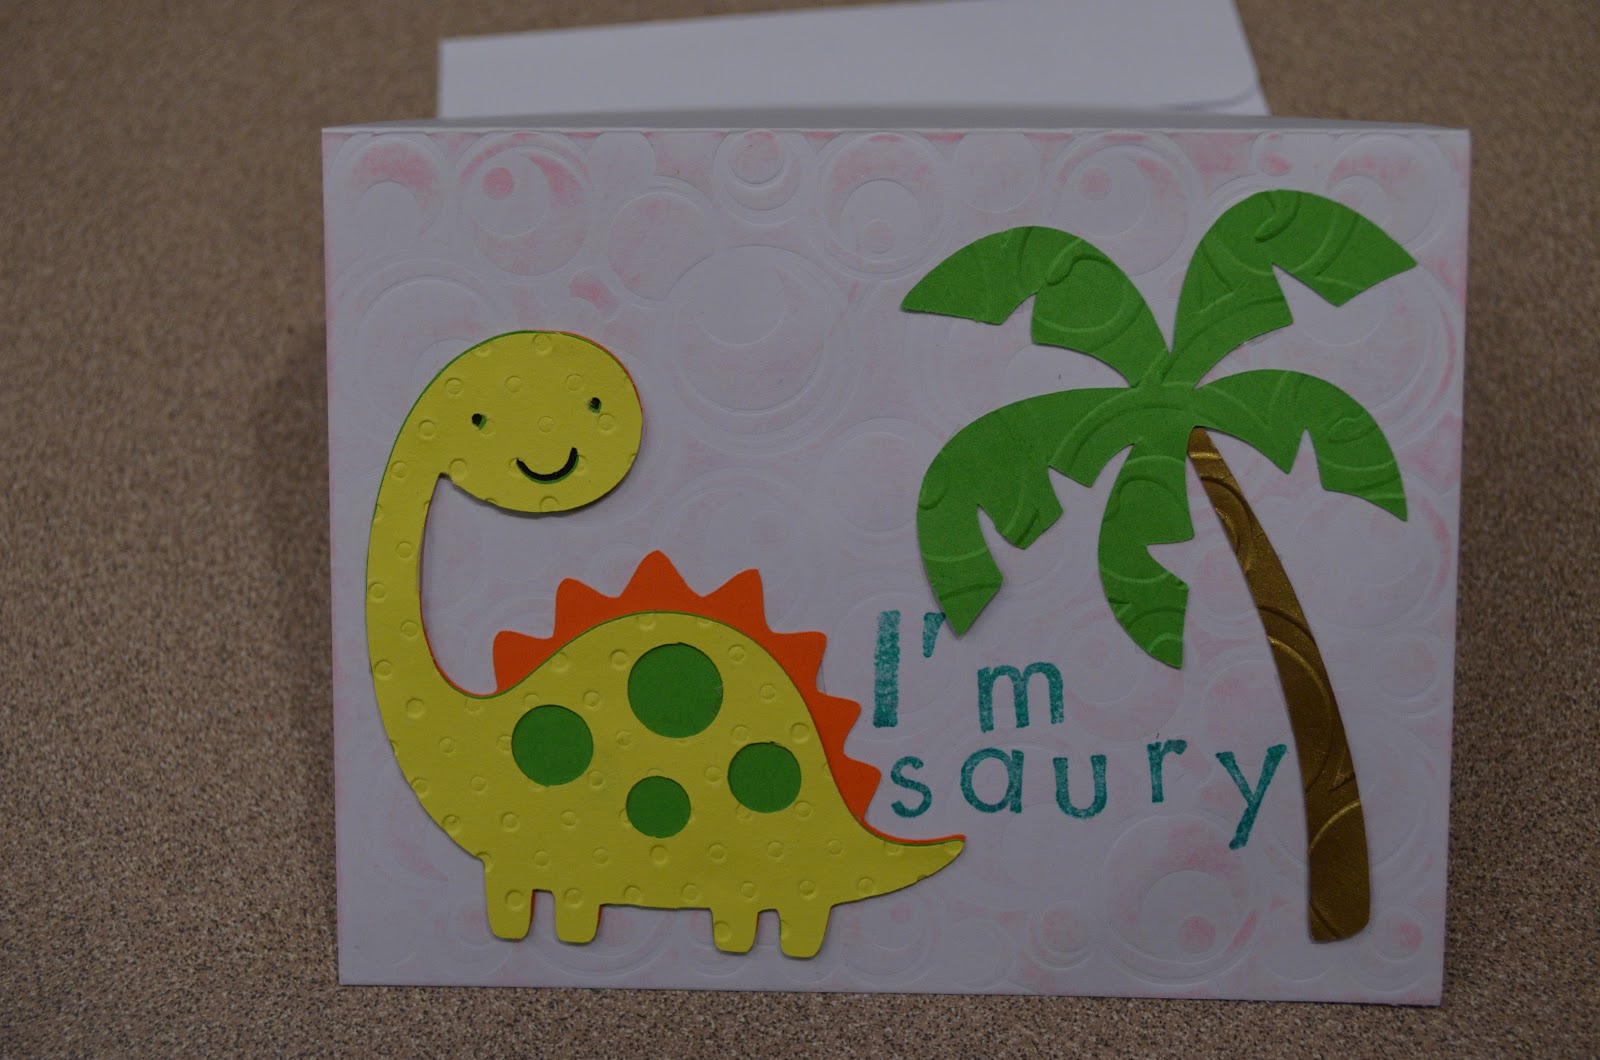
"I'm Saury"
Cricut Create a Critter
Sizzix Dots embossing folder
Sizzix Swirls embossing folder
Spellbinders Circles Impressabilities
Fiskars Basic Alphabet stamp set
  
"You're a Hoot"
Cricut Create a Critter
Sizzix Swirls embossing folder
Fiskars Basic Alphabet stamp set


"Get Whale"
Cricut Create a Critter
Cricut George and Basic Shapes
Sizzix Dots embossing folder
Sizzix Swirls embossing folder
Fiskars Basic Alphabet stamp set

Get Whale envelope
Sizzix borders


"No one could BEE nicer than You"
Cricut Create a Critter
Sizzix Dots embossing folder
Fiskars Basic Alphabet stamp set
Martha Stewart Daisy Embellishment

This is my Fantabulous Cricut Challenge me Monday entry for Challenge # 98 Fun with Puns!


The inside was done with a generic rub on
On the envelope
Cuttlebug Love is in the Air borders


Wednesday, February 15, 2012

The way to a man's heart...

Is through
Cupcakes!!!
Have I mentioned that I Love Love Love to make cupcakes.  I love to experiment.  I love to find new ways to make them YUMMY!!  So for Valentines Day yesterday I made an order for a friend of six Snickers Cupcakes and six "Chocolate Indulgence" cupcakes.  And then I made a special cupcake for me and Big B for V-Day.  I called it the "Bleeding Heart"  YUM! I use a devils food cake as the base cake for all three.  Here is my favorite Devils Food cake recipe
  • 1 1/2 cups butter
  • 1 1/4 cups unsweetened cocoa powder
  • 1 1/4 cups hot water
  • 3 cups flour
  • 1 1/4 teaspoons coarse salt
  • 1 teaspoon baking powder
  • 1 teaspoon baking soda
  • 2 1/4 cups granulated sugar
  • 4 large eggs
  • 1 tablespoon plus 1 teaspoon pure vanilla extract
  • 1 cup sour cream
  The Snickers cupcakes have a FROZEN bite sized Snickers bar in the middle.  I place that in the batter prior to baking.  Then I top the cupcake with a salted butter cream and ganache (see bottom for recipes).  Soooo good!
Snickers Cupcake

For the "Chocolate Indulgence" I use the base cake.  I inject the center with ganache once it is baked, top with my super secret (best ever) chocolate butter cream recipe, the top with more ganache. Heaven in your mouth!
"Chocolate Indulgence" Cupcake

For the "Bleeding Heart" I use the same base cake as above.  After baking I inject my super yummy strawberry filling into the middle (see below for recipe).  I top with my super secret chocolate butter cream and ganache.  This cupcake was TO DIE FOR!  Big B LOVED it! 

"Bleeding Heart" Cupcake


Inside of the "Bleeding Heart" Soooooooo Goooooooood!!!!!

Oh and notice how great my pictures look today??  I figured out how to set my own White Balance on my camera.  No more yellow tinge.  None of the preset WB liked my kitchen lighting.  I love the last picture!! I think that it turned out pretty!  Enjoy making your own yummy cuppies! 

Salted Caramel Butter cream:
  • 1 stick salted butter
  • 1 stick unsalted butter
  • 1/2 teaspoon sea salt
  • 2 cups powdered sugar
  • Favorite caramel sauce (I make my own)

Beat butter until fluffy. (preferably with the paddle attachment if you have a stand mixer) Add the sugar slowly.  Add salt.  Add you sauce to taste.  (I don't know how much sauce I actually add)

Ganache:
  • 4 oz bittersweet chocolate, chopped into very small pieces
  • 1/2 cup heavy whipping cream
  • 2 tablespoons agave nectar  (or you can use honey)
  • 2 tablespoons light corn syrup
  • 2 teaspoons vanilla
 In a small saucepan over medium heat, warm the heavy cream until very hot, DON'T allow to boil!
  Pour the hot cream over the chocolate in a heat safe bowl (Do Not use the saucepan or it will continue to cook and scorch your chocolate) and allow it to sit for about 5 minutes. Whisk the cream and chocolate until smooth and thoroughly combined. Add corn syrup, agave, and vanilla. Allow to cool for about 15 minutes. Do Not let sit for too long or it will harden before it can be drizzled over the frosting.

Strawberry Filling:
  • 2 ½ cups coarsely chopped hulled strawberries
  • ½ cup sugar
  • 2 ½ tablespoons cornstarch
Bring all ingredients to a boil in a small sauce pan, stirring constantly and crushing berries with back of spoon. Boil 2 minutes to thicken, stirring constantly (mixture will be slightly chunky) Pour into bowl and cool completely.


"Dream as if you'll live forever, eat Cupcakes as if you'll die today."
~ Unknown Author


Tuesday, February 14, 2012

I heart Calzones

Every time I make pizza the crust curls while baking.  I have tried a million and one ways to fix it and it always curls.  I have decided that I am just destined never to make pizza at home.  So instead of crying over my lost pizza I make calzone instead.  It is too easy!  I have a bread Machine (Courtesy of my In-Laws this Christmas) and I make home made dough.  You can make your favorite pizza dough or get a roll from the store.  It works too I promise.  I don't have any fab homemade pizza dough recipes to share, I just use the one out of my bread machine cook book.

You will need:
Pizza dough
Pizza sauce
Cheese
Favorite toppings

Roll out your dough into a rectangle and place it on a baking sheet.  It is OK if the sides hang off a little, but not the ends. (I used a store bought roll of pizza dough this time because it was a last minute decision to make a calzone for dinner)  
Put your sauce and cheese just in the middle.

Add your toppings. For this calzone, I put bacon, sausage, and peperoni.  Yum.  I like to have a layer of cheese below and on top of my toppings. Preference really.

Now cut (I used my kitchen sheers) strips in the dough on both sides.  Leave a gap, do not cut all the way to the sauce in the middle.

When finished it should look like this.  
Now alternate folding over the strips so that the go all the way across the toppings (which is now actually filling)
When finished it should look like this.  
Bake according to your specific pizza dough directions.  I then brush garlic butter all over my calzone, but again that is a preference!
MMMMMMMM'joy!

Monday, February 13, 2012

Dinner Experiment #1

I had to drill this weekend, so I didn't get to do anything crafty.  I just got to run around in my Army get up and be the boss :) So this Monday I am including two of my dinner experiments.  Tomorrow I am going to post how to make a super easy, fabulous looking, braided calzone!!

This past week I made two new dinners.  The first one was Cheddar Chicken Pie.  I got the recipe from Taste of Home: Casseroles book.  I actually followed this recipe, that is a rarity for me!  I usually add ingredients or modify the recipe in some way or another.  Oh wait, I did modify this one.  I used a broccoli and cauliflower combo instead of just broccoli.  And it said to make it in a pie pan and I did not.  

Here is the recipe as it is in the book:

Prep: 20 min. Bake: 30 min.  Yield: 6 Servings  

Ingredients:
  • 3 cups (12 ounces) shredded cheddar cheese, divided
  • 3 cups frozen chopped broccoli, thawed and drained (I used a broccoli and cauliflower frozen combo)
  • 1-1/2 cups cubed cooked chicken
  • 2/3 cup finely chopped onion
  • 1-1/3 cups 2% milk
  • 3 eggs
  • 3/4 cup biscuit/baking mix
  • 3/4 teaspoon salt
  • 1/4 teaspoon pepper

Directions

  • In a large bowl, combine 2 cups cheese, broccoli, chicken and onion; spread into a greased 10-in. pie plate. In a small bowl, beat the milk, eggs, biscuit mix, salt and pepper until smooth. Pour over broccoli mixture (do not stir).
  • Bake at 400° for 30-35 minutes or until a knife inserted near the center comes out clean. Sprinkle with the remaining cheese. Let stand for 5 minutes or until cheese is melted. 
This is what my Cheddar Chicken Pie turned out looking like.  

The second recipe I made was Tamale Pie.  I had seen a few different ones out there so I kind of incorporated them all into one.  Lil Mr. and Big B ate this up!!   

Ingredients:


  • 1 lb. ground beef
  • 1 onion, chopped
  • 1 can stewed tomatoes NOT DRAINED
  • 1 can kidney beans drained
  • 1 envelope taco seasoning
  • 1/2 tsp. pepper
  • 1 tsp. salt
  • 1 box Jiffy corn muffin mix and ingredients need to make mix


YUM!!!

Directions:

Brown ground beef and onions, if excess fat, drain. Add tomatoes, beans, and seasonings. Blend together and simmer covered for 15 minutes. Add spices to taste. Pour mixture in baking pan, preferably 13 x 9 cake pan. Mix corn muffin mix following the box directions. Pour over meat mixture. Bake at 425 degrees for 20-25 minutes.

Ingredients: